Wanting to be the DIY master in your house? There has never been an easier way to do so than with our Plastic Shed Bases. Not only are they incredibly simple to install but they also have a number of benefits you may have never even considered a base may need. Firstly, our bases will last a long time thanks to being UV, Weather and Rot resistant. Secondly, they are permeable, meaning that any rain or excess water can naturally drain away from your shed and lessen the chance of any shed rotting occurring. Thirdly, they can be easily installed regardless of if you have any prior knowledge or experience with DIY/Gardening/Landscaping. Jonathan in our case study was looking for a new base, read on to find out what base he decided on and what he thought of it.
Jump To:
| The Project | The Work | Conclusion |
The Project
Jonathan contacted us a few weeks ago as he had been searching for the perfect base for his new wooden log storage shed. The options he had considered so far had negatives that were too important to ignore and go ahead with. He had looked at a solid concrete base which would have cost almost double what a plastic shed base did or would have been very labour intensive for Jonathan to lay the wet concrete or slabs. He also considered using wooden planks as a base but there is a chance that should any water get under or near the planks then there is no way of it escaping and will eventually lead to the rotting of the base and shed.
So after a little deliberation and speaking to us, Jonathan ordered 36 panels of Plastic Shed Base and received the base 3 working days later. Read on to find out how Jonathan installed his base and shed.
The Work
Jonathan knew exactly what he wanted to achieve from his project, he had already planned where the base would be installed, which gravel to use and how much he would need. Planning is a vital part of any project, having a clear image in your head of what you would like to achieve not only gives you a goal to work towards but will help you decide what order to do everything in.
To start his project, Jonathan chose an area by the fence in his garden and cleared the turf from that entire area. With a now clear area, Jonathan laid a sheet of Shed Base Membrane and secured this into the ground using Shed Base Membrane Staples. Membrane is used to allow any water to drain away whilst being a barrier and stopping any weeds or plants growing up and through the shed base.
Next, instead of using a layer of sand or hardcore, Jonathan used a layer of 10mm gravel to create a sub-base on which to stand the shed base. We recommend having a sub-base as when weight is applied to the base it ensures there will be little to no movement. Where as if the base is installed straight onto the membrane there may well be movement.
With the sub-base in place, Jonathan could begin installing the plastic shed base, laying one panel at a time and easily connecting them as he went along, this part of the project took no time at all. To ensure that the base was true, the entire foundation was laid using a spirit level. With his base now installed and straight, Jonathan filled the entire base with 10mm gravel and around the base was filled up with decorative 20mm gravel to improve the look of the area.
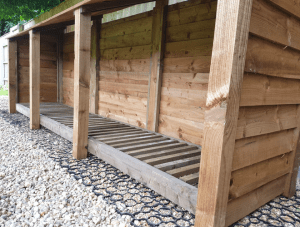
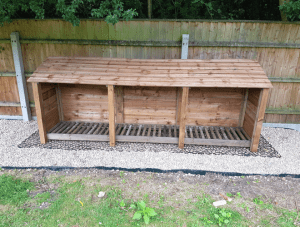
Finally, with the base installed and the surrounding area filled with gravel, Jonathan could install his Log Storage Shed. As you can see from the photos in this blog, Jonathan’s garden looks fantastic.
Conclusion
Jonathan is incredibly pleased with how his project turned out. He now has an amazing looking area where can safely store his logs for years to come. Thanks to the base and correct preparation his shed is on a sturdy foundation with a good airflow and away from any grass or dirt to prevent his shed from rotting. Not only that but it looks great too!
“Now we have an area where water can drain away from the shed easily with a firm base that won’t wash away. Next on the list is to move all logs to the shed!”
We would like to say a massive thank you to Jonathan for using our base and for sending us the information and photos to create this case study. Should you have any questions regarding our bases or photos to share with us then please do contact us.


